Overall I think, as far as I did get, I did reasonably well in making it look like my face with the lips eyes and nose but without the rest it isn't easy to tell that it is me.
Friday, 23 October 2009
Evaluation
If I had more time I would of finished the first section as quickly as possible so I had time to finish the UVW map and actually get it to work. It was very aggravating for me to get so far and be unable to get the map of my face to work properly. I spent lots of time on editing the points to make it look like my face but ran out of time for the final stage as it took so long to get the UVW map to be created.
Finished Model

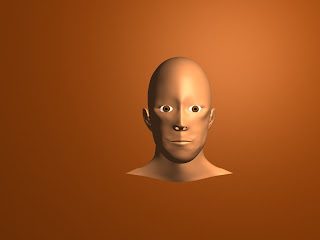
This was what I came up with for the final image. I had a lot of difficulty with the UVW mapping and couldn't get it to work for my model. I think the actual imag
e looks like my face but without hair and a proper texture it is hard to determine.
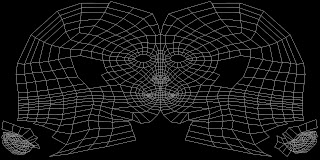
Here was the wireframe I did get but there is too much overlapping which made the end result a mess..
Ear Attachment

Here I have attached the ear to my head. This took a long time because my quads would not line up properly at first. I ended up creating a lot of extra quads and moving the points around to get it looking how it should. I am reasonably pleased with the final result.
Modelling The Ear

Here is the version of my ear I have created. This was done by taking the image of the side of my face, and doing a separate topology for my ear. I found this quite hard to do because the ear is quite a complex shape to model.
Once the topology was done I had to stretch out the ear to be 3D, so in the left view port I dragged out the edges of the ear. Then I had to try to work out how my ear is formed, and by using the extrude tool created the different variations of depth on it. Then I used the turbosmooth modifier to show how it would look, and I was quite happy with the result.
Thursday, 22 October 2009
Back Of Head And Neck

As you can see above, I have now modelled the rest of my head and neck. I have also added eyes to my face.
To create the rest of my head I used the spherical tool to create a sphere which I then cut away to only the parts which I needed for the top of the head. I then altered the segments to make it line up with the existing polys in my face. Then I used the clone tool to create the additional polys needed to make the rest of my head and neck. Then I lined it up correctly with the picture from the left view port to make it 3D and have the correct definition. I then attached it to the face which I had already created.
To make the eyes I just used a spherical tool to make a ball which I then imported a material which was suitable for an eye. I then tiled the image once and cut the eye in half so only the front of the eye, which is the bit which is need was showing.
Wednesday, 21 October 2009
Nose And Lips Modelling

Here I have used the turbo smooth modifier to make all the edges and lines in my face a bit smoother, to make it look more realistic. I have also created the nose and the nostrils, as well as the lips.
The nose was created by using the edge selector to select the edges on the inside of the hole where my nose would be, and then holding shift using the scale tool to drag out the edges. This meant I could then join the new points up to the correct places. To make it more defined, I used the connect tool to make more polys for me to work with. This made the existing polys that I selected to be cut in half so there were twice as many. I then used the create tool to make the nostrils. I also made sure to use the weld tool on any points which were on top of each other to join the edges up. To make the nose 3D, in the left viewport I dragged out the new points to the correct positions. This made the whole face look a lot more realistic.
To make the lips I basically used the same method, of selecting the inside edges and holding shift and scaling the edges out to make new polys. Then, using the connect tool again I made more polys to give the lips better definition. I then joined up the points and welded them together.
Horizontal Side Alignment

Once I had the face as a poly model, I had to create the other side of my face. This was done by using the symmetry modifier. This basically lets you mirror your face from a point you decide, and copies all the details from that side. If you make changes to the original side, it will also still copy that over to the other side.
The next step I took was to pull the face out from the side, and to begin joining the points up to the points which I had drawn on the image of my face. This was quite easy but took a long time to get exactly right because every edge had to be smooth, to get to looking how it should.
Drawing The Quads

This is the next stage in drawing my face. After importing the image into 3D studio max and putting them onto a plane, I have now begun drawing the outlines of the quads.
To do this I used the line tool and snap to vertex to join the points of the quads up. This took a while to get right and I didn't strictly follow the lines I already drew on the image because it wasn't 100% accurate. The next stage was to make them into polygons so you can see the face in a basic 3D model.
Monday, 28 September 2009
Topology Of My Face


(Click the image to view a larger version)
Topology
Above is the topology of my face. It shows the details of the shape of my face with the blue lines being major lines and changes, and the red lines making quads to help me create my face in 3D Studio Max later.
Next I will bring this image into 3D studio Max to begin creating my face as a virtual character.
Friday, 25 September 2009
My Face - In 3D!
Week 1
In my first week back I received my brief for 3rd Year 3D modelling. This consists of using images of my own face to produce a 3D character of myself. I have tried doing this before using tutorials on Youtube and other sites to model a 3D cartoon character and found it quite time consuming, and intense. I have also tried modelling my car in 3D studio before, using blueprints from a website in which I managed to draw the first half of my car but gave up when it came to the wheels and various technical details.
Initially I will be taking a front and side view of my face to show all the details required to make it a 3D model. Then, using photoshop I will align the specific sections of the face, for example the nose, pupils in the eyes etc. to make sure the side profile will be in proportion to the front.
The next step in the process is to draw the outlines of wrinkles and lines where the face is defined, with blue lines. This also helps to separate the different facial muscle groups in my face. Then, using red lines I will break my face up into quads (four sides shapes) as this will be the way to define the face in 3D studio later on.
Subscribe to:
Comments (Atom)